Heat Cable Power Connection Kit
Product Overview
This heat cable power connection kit provides a secure electrical connection for self-regulating pipe and roof deicing systems. Stop relying on temporary solutions for permanent problems. When it’s time to hard-wire your heat cable directly into a junction box, the connection point is your biggest vulnerability. Water and electricity are a disastrous combination—especially in a frozen gutter.
We don’t cut corners on our own job sites, and neither should you. This Power Connection Kit includes the exact industrial-grade components we trust on Wasatch Heat Cable installations to guarantee a 100% water-tight, fail-proof electrical transition from your heat cable to your power source.
Whether you are preventing roof ice dams, tracing pipes, or heating flat surfaces, this is the definitive kit for a permanent, hard-wired connection.
🧠 Critical Thinking: The “Triple-Seal” Defense
Why is this kit different from hardware store splices?
Most DIY electrical failures happen because water wicks into the connection. We combat this using a three-part defense system:
-
The CGB (Cord Grip Connector): Provides a crushing mechanical seal and strain relief. If ice pulls on the cable, the CGB holds the weight, protecting your delicate electrical splices inside the junction box.
- Mastic Tape: Acts as a pliable, waterproof putty that forces its way into every microscopic void between your wires. Beyond just locking out moisture, it serves as a critical electrical barrier, completely isolating and protecting the energized components inside the splice.
- Glue-Lined Heat Shrink: A heavy-duty, 1-inch diameter outer jacket featuring an internal adhesive lining. As heat is applied, this glue activates and bakes the mastic down into a permanent, watertight armor, effectively sealing the entire connection with a waterproof bond at every point of contact.
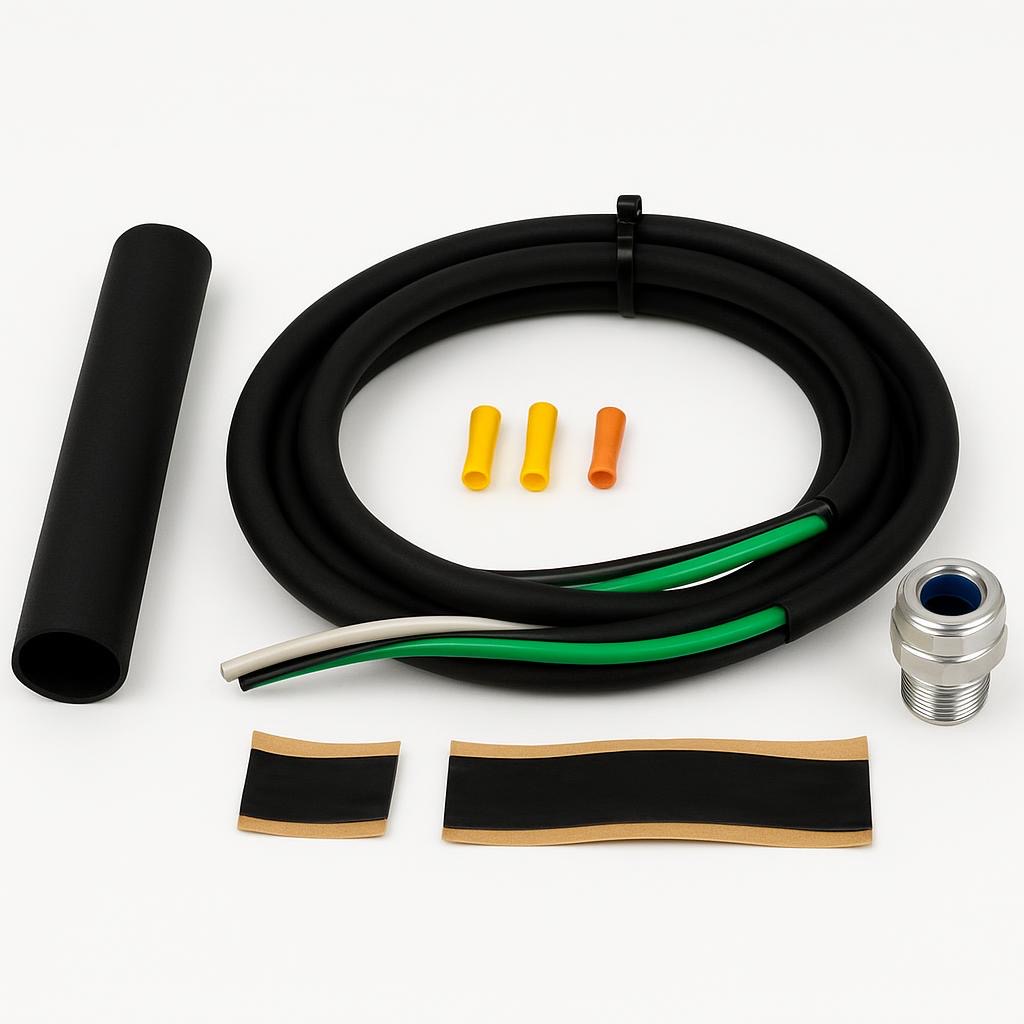
📦 What’s Included in the Kit:
-
(1) 3-Foot SJO Cold Lead: Industrial-grade power cord that remains flexible and durable even in sub-zero temperatures.
-
(1) CGB & (1) Lock Nut: Ensures a liquid-tight entry into your junction box with unmatched strain relief.
-
(1) 1” Diameter Heat Shrink Tube: Heavy-wall outer jacket for ultimate environmental protection. Glue-Lined to create a life long water tight seal.
-
(1) Mastic Tape: The secret weapon for electrical barriers and locking out moisture.
-
(2) Wire Butt Connectors & (1) Copper Crimp Sleeve: For secure, permanent electrical splicing of your hot, neutral, and ground wires.
🛠️ TOOLS NEEDED FOR INSTALLATION
Don’t start this splice without the right gear. A bad connection is almost always the result of using the wrong tools.
-
Heat Gun: Do not use a hair dryer or a lighter. A lighter will leave conductive soot on the cable, and a hair dryer won’t get hot enough. You need a real heat gun to properly shrink the heavy-wall tubing.
-
Professional Wire Crimpers: Pliers will not cut it. You need a dedicated crimping tool with the leverage to permanently crush the butt connectors and copper ground sleeve. A loose crimp leads to electrical arcing and system failure.
-
Wire Strippers: For stripping the insulation off the SJO cold lead and exposing the bare buss wires inside the heat cable.
-
Adjustable Wrench or Channellocks: Required to crank down the CGB (Cord Grip Connector) and lock nut onto your junction box for a watertight mechanical seal.
-
Flush Cut Snips / Side Cutters: To cleanly trim back the conductive black matrix core of the heat cable, leaving only the bare buss wires exposed for splicing.
🔥PRO TIPS FROM THE FIELD
Insights from the Wasatch installation crew:
-
Stagger Your Splices: Over lap your ground wire from the SJO power cord and place the copper crimp on the side with the heat cable. This will add extra electrical protection from your heat cable bus wires.
-
Heat from the Center Out: When shrinking the 1″ tubing, start your heat gun in the dead center of the tube and work your way toward the edges. This forces any trapped air out of the ends and ensures the mastic tape melts evenly for a perfect seal.
-
The “Ooze” is Good: You know your connection is completely water-tight when you see a tiny bit of the black mastic tape oozing out of the ends of the heat shrink tube as it cools.
✅ COMPATIBILITY CHECKLIST
This kit is the correct choice if:
-
You are hard-wiring your heat cable permanently into an outdoor junction box or controller.
-
You need to transition from flat heat cable to a round SJO power lead.
-
Your system requires a weather-tight, code-compliant connection.
❌ INCOMPATIBLE / DANGER
DO NOT use this kit if:
-
You intend to plug your system into a standard wall outlet (Use our Lighted Plug Kit instead).
-
You are trying to splice two pieces of heating cable together (This requires a specific Splice Kit, not a Power Connection Kit).
⚠️ CRITICAL WARNING ⚠️
GFCI Protection is Mandatory. Per National Electric Code (NEC) 426.28, all equipment for deicing and snow melting must be protected by Ground Fault Equipment Protection (GFEP). When hardwiring this kit to your electrical panel, you must use a GFCI/GFEP breaker. Do not bypass this life-saving safety feature.
🧪 HOW TO TEST YOUR CONNECTION
Don’t just flip the breaker and hope for the best. Verify your splice like a professional.
Once your heat shrink is sealed and your connection is wired into the junction box, run through these checks before declaring the job finished:
1. The “Ooze” Visual Inspection Before you even turn the power on, look at the ends of your heat shrink tube. You should see a tiny ring of the black mastic tape pushed out of the edges. If you don’t see the mastic, you either didn’t apply enough heat, or you didn’t use enough mastic tape. That seal is what keeps the water out.
2. The Insulation Resistance (Megger) Test This is the gold standard for professionals. Before energizing the system, use a megohmmeter (Megger) to test the cable at 1000V DC or 2500V DC between the buss wires and the ground braid. You want a reading of at least 30 megohms. If it reads lower your splice or the cable jacket is compromised.
3. The Amp Draw Check Once the system is energized, put a clamp-on amp meter around the hot wire in your panel or junction box. The cable will draw a higher “inrush” current for the first few minutes as it warms up, then settle down to its steady-state amp draw. If it draws zero amps, your splice failed. If it immediately trips the GFCI/GFEP breaker, you have a ground fault in your connection.
4. Thermal Verification If you want absolute confirmation that power is making it past your splice and into the cable, use a thermal imaging camera (like a Seek Thermal or FLIR) on the first few feet of the heat cable. Within 10 to 15 minutes of being energized, the core should clearly glow warmer than the surrounding ambient temperature on the camera screen.
❓ FREQUENTLY ASKED QUESTIONS
Can I leave this spliced connection laying inside the gutter? It is highly recommended to keep your connections out of standing water or extremely wet conditions. Even though the splice is designed to be watertight, best practice dictates that you never allow it to sit submerged for long periods, especially while the cable is running. The temperature fluctuation of the operating cable creates a suction effect, which can pull moisture in through any microscopic weak points in your seal.
Can I use a blowtorch or lighter instead of a heat gun? We do not recommend it. A direct open flame is very difficult to control and can easily scorch the heat shrink, the heating cable, or the SJO wire. Burning any part of the connection weakens its waterproof barriers, significantly shortening its lifespan. We highly recommend using a heat gun for a safe, reliable installation.
Can I use this kit to repair a cut in my heat cable? No. This kit is specifically for transitioning from flat heat cable to a round power wire (SJO cord). If you need to connect two pieces of heat cable together, you must use a dedicated Splice Kit, which is engineered to safely join the conductive cores together. The splice kit additional components to complete a cable to cable connection properly.
How long is the cold lead cord? The standard SJO cord included in this kit is 3 feet long. This provides plenty of length to route the cable out of your junction box and establish a proper “drip loop,” ensuring water drips off the wire rather than running down into your electrical connections. Custom lengths can be accommodated upon request for an additional charge.
Does it matter which buss wire goes to the hot or neutral? No. Self-regulating heat cable does not have a designated “hot” or “neutral” side on the two internal buss wires. However, the braided metal shield must be securely twisted and crimped to your ground wire using the provided copper sleeve.